Friday, January 17, 2014

Marathi Calendar (2104) for Google Calendar, Android Phone and other calendar applications.

Do you live away from home and miss out many of the festivals and sometimes aren't even aware of dates of your favorite Marathi festivals? Don't know when is Holi, Ganesh jayanti, Rakshabandhan or Diwali? That happens with most of us in this busy and fast life.

You can always buy a Marathi Calendar to check the dates, but that would only be available at your home or wherever you live. It would have been better, if you could carry it everywhere you go and that could remind you of your interested dates and festivals. Yeah, there are many mobile Marathi calendar applications for your smartphones, but those also have some drawbacks. Like, they are huge in size and so consume lots of your phone memory, those are specific to a year only and so for next year you will have to install a new one again, and also those are only available on mobile, can't be checked online.

So, to simplify the availability of Marathi calendar you can follow below simple steps, with which you will be able to sync a Marathi calendar to your Google calendar application and so to your Android phone or any other calendar application that supports iCal calendars.

Add the Marathi Calendar to Google Calendar. 

To add and sync a Marathi Calendar to you Google Calendar follow below steps:
  • Go to www.google.com and login to your Google account (gmail account). On Google home page, on right upper corner you should be able to see yourself logged in, click on Calendar, that will take you to your Google calendar.
Google Calendar

  • Then click on a downward arrow next to Other Calendars, on a left panel, and select Add by URL
Add by URL

  • Copy and paste this URL into URL field:


            and click Add Calendar button. 
  • Then you should be able to see a new Calendar under Other Calendars with name Nilesh Injulkar.
  • Optionally you can select calendar event color for this Calendar by clicking downward arrow next to it.
Select (Select the colored checkbox) this calendar then you should be able to see the Marathi Calendar into your Google calendar.


Sync the Marathi Calendar to your Android phone.

Once you have added the Marathi Calendar to your Google Calendar, you can easily add it to your Android mobile calendar, provided that you have logged into your Android with same gmail id.

Make sure you are connected to Internet on you Android phone, either over wi-fi or a packet date.

Also, you should have enabled the sync for your Google account at least your Sync Calendar option. To check this on your mobile go to Settings > Accounts and sync.
There you should be able to see your gmail account, select it, you will see Sync Calendar, click on it and then it will start the sync of your Google Calendar. Depending on your Auto-Sync option, you would either see Touch to Sync now or a checkbox for Sync Calendar option, any way select it, and Calendar sync will start.

Wait for Sync to complete.

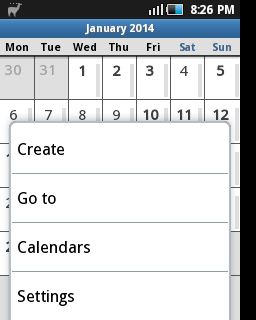
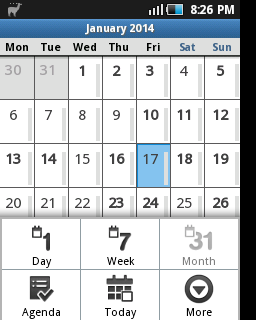
Once the sync is done, go to Calendar application on your mobile. Click on a menu button , the one that shows a menu. 
Menu on Android Calendar
Calendars
     

From there select More > Calendars, and then you will see the list of your calendars. Under your email-Id there should be a new calendar named Marathi Calendar By Nilesh. Make sure this calendar is Synced and Visible, if not, mark it so by using a button next to it and hit OK.
Synced and Visible

Once that is done, you will be able to see the Marathi Calendar in your Calendar application of your Android phone. Go through Day, Week and Agenda options to see the Marathi Calendar festivals as full day events on corresponding dates.


Agenda
A day on Marathi Calendar
    
As of now I have added Marathi Calendar 2014 only. By end of the year I will add next year Calendar to it and will keep updating it for upcoming years. You don't need to do anything,  added calendars will be synced to your Google Calendar and mobile Calendar automatically.

You also can add reminders to particular events, festivals, by clicking on it and Add reminder button.

The Google calendar link mentioned above can also be used in many other calendar applications which provides facilities to add iCal calendars from internet links, to sync and view the Marathi Calendar.

Enjoy the Marathi Calendar.
Jay Maharashtra ! 


Monday, March 4, 2013

jQuery datepicker range : Select date with From and To.

    jQuery datepicker is one the sophisticated ui components jQuery provides. There are loads of options to customize the datepicker as per your needs. Generally it's used on a text field, which when clicked opens an interactive calendar. User selects a date and input field gets filled with the date in appropriate date format as per our configuration. 

  There are many uses of this kind of datepicker. One of them is to select a range of dates with structure like select date From and select date To. Just the way shown below :


Datepicker range
   
     Creating this kind of range datepickers in jQuery is very easy. You need to use onSelect callback function along with minDate and maxDate. The idea is that when user selects "from" date, the selected date is set as minDate for "to" datepicker. And when user selects "to" date, the selected date is set as maxDate for "from" datepicker. This enables user to select a date in appropriate range only and you need not to perform any range validation like say "to" is not older than "from". 

    Consider "from" and "to" are ids of from and to datepicker's text fields. I believe you have included js files for jQuery and jQuery UI along with css file of UI. The code snippet looks like this : 


 1
 2
 3
 4
 5
 6
 7
 8
 9
10
11
12
13
14
15
16
 $( "#from" ).datepicker({
      changeMonth: true,  
      changeYear:true,      
      maxDate:0,
      onSelect: function( selectedDate ) {
        $( "#to" ).datepicker( "option", "minDate", selectedDate );
      }
    });
    $( "#to" ).datepicker({      
      changeMonth: true,   
      changeYear:true,
      maxDate:0,
      onSelect: function( selectedDate ) {
        $( "#from" ).datepicker( "option", "maxDate", selectedDate );
      }
    });


    Please take note of how onSelect function is used and how minDate and maxDate are set. 
    Setting maxDate to 0 (today) is used to prevent user from selecting date larger than today's date, this is used mainly because range datepickers are generally used to select date from past like selecting range for showing history logs, college years etc. You can use or remove that as per your needs.

   This fiddle shows how it works : 


Saturday, January 26, 2013

ForwardAction and IncludeAction in struts


   The org.apache.struts.actions.ForwardAction class enables you to forward request to the specified URL without going through Controller. ForwardAction is an utility class  used in cases where a user simply needs to forward the control to another JSP . Doing this directly violates the MVC principles.  So they have given this option for  action-mapping. Note that we do not  create any action class here. With ForwardAction , simply create an action mapping  in the Struts configuration file  and specify the location where the action should forward the request with the help of "parameter" attribute of action tag.
For example:

In JSP :

<html:link page="/Welcome.do">
           Click here
</html:link> 


In strus-config :

<action-mappings>
<action
  path="/Welcome"
  type="org.apache.struts.actions.ForwardAction"
  parameter="/Welcome.jsp"/>
</action-mappings> 


there is shortcut for above configuration. you can achieve same simply by:


<action path="/Welcome" include="/Welcome.jsp"/>


org.apache.struts.actions.IncludeAction is somewhat like ForwardAction but the resulting resource is included in the HTTP response instead of forwarding the request to. Actually this is of not much use. Its mainly used to integrate old/legacy applications with Struts transparently. More like integrating simple servlet into struts application. 

In Struts-config file:


<action path="/hello" parameter="/helloServlet"   type="org.apache.struts.actions.IncludeAction"> 
</action>

Jsp:


<jsp:include page="/hello.do"></jsp:include>


The parameter attribute indicates the actual resource that has to be included in the response. As mentioned earlier, the use of IncludeAction is limited to including responses from existing Servlet in the current page. This requires the use of <jsp:include> in the jsp page.


Thursday, January 17, 2013

DynaActionForm in struts with example.


      If you are writing Struts application, you are expected to write a FormBean for every page. But it's too tedious to write lot's of FormBeans with just getters and setters for the fields.
      You can avoid this by using DynaActionForm (Dynamic Form Beans) which are an extension of FormBeans that allow you to specify their fields inside the Struts configuration file itself instead creating concrete classes with getters and setters.
    For using this, you need to configure the form bean of DynaActionForm inside strust-config file. Do it this way :


<form-bean name="dynamicLoginForm" 
           type="org.apache.struts.action.DynaActionForm">
           <form-property name="userName" 
                          type="java.lang.String" 
                          initial="nils"></form-property>
           <form-property name="password" 
                          type="java.lang.String"></form-property>
</form-bean>

"name" attributes of "form-property" specify the field names and "type" specify the type of the field. you also can specify the initial value by "initial" attribute. And use dynamicLoginForm(name) of this form bean as value for name attribute of corresponding action just like normal FormBeans .


<action path="/login" 
            name="dynamicLoginForm">
</action>


    Now the values of fields of corresponding form on the webpage will be populated to the form which will be dynamically created. 
   So you need a way to access this values in Action class's execute() method. For that you need to use get() or getXXX() methods of DynaActionForm.
    Following snippet shows the way to access fields of DynaActionForm in execute() method of Action :

public ActionForward execute(ActionMapping mapping, 
                             ActionForm form,
                             HttpServletRequest request, 
                             HttpServletResponse response)
                      throws Exception {


     DynaActionForm theForm = (DynaActionForm)form;
     String userName = theForm.getString("userName");
     String password = (String)theForm.get("password");


}

Well, DynaActionForm is this much simple :)

What is resource bundle in struts and using multiple resource bundle files.

      Resource bundles allow Java applications to be easily internationalized by having application content placed into bundles. This content can then be read by the application at run time. Therefore, instead of having content hardcoded in the application, the application reads its content from the bundle. Struts has built-in support for working with Java's resource bundle mechanism. 

      Resource bundle resources can be accessed from JSPs to populate them with content. Resource bundle properties files simply contain key/value pairs. The resources are accessed by their key. The standard name for the resources bundle properties file in struts is MessageResources.properties. 
   Thes files may contain key/values like this login.empty=Empty username and passwordtitle=Struts Relearn
   
      These files are configured in struts-config.xml :

1
2
<message-resources parameter="com.nils.resources.MessageResources">
</message-resources>

keep in mind that the parameter attribute is a file name without .properties extension.You can access these values in JPSs like this 


1
<bean:message key="title" />

given that bean taglib is configured in the JSP.


     If you want to use multiple properties files with different values for the keys. Then  you just need to specify "key" attribute of message-resources in struts-config.xml entries.

1
2
3
4
5
6
<message-resources parameter="com.nilesh.resources.MessageResources" 
                   key="NormalCase">
</message-resources>
<message-resources parameter="com.nilesh.resources.AnotherMessageResources" 
                   key="UpperCase">
</message-resources>

        And while using them in JSP use "bundle" attribute of bean:message.


1
2
<bean:message key="title" bundle="NormalCase"/>
<bean:message key="title" bundle="UpperCase"/>

bundle attribute is mapped to key attribute of message-resources which specifies the properties file. 

        If you configure multiple message-resources and don't specify the keys for them both of them will have default key 

"org.apache.struts.action.MESSAGE"

so when they are used in JSP it will see two files configured with same key and will throw excpetion, this is the same exception you may see when message-resources is misconfigured:


SRVE0068E: Uncaught exception created in one of the service 
methods of the servlet /index.jsp in application StrutsEar. 
Exception created :
com.ibm.websphere.servlet.error.ServletErrorReport:
javax.servlet.jsp.JspException: Cannot find message resources under key 
org.apache.struts.action.MESSAGE.