Friday, January 11, 2013

How to use offline Google maps on android phone in India.

Recently Google launched offline google maps for android phones in India. This new feature allows you to store map of some area on your phone for later use. Say you are going to some new or remote area and not sure if GPS is available there or not, or your network provider provides network there or not, or say you don't use internet on your phone always and you need map under such circumstances then it's better to download map of required area in advance.

No doubt this feature is of great use. This service was available in US and many European countries and now it's made available in India too.

Below are simple steps to get offline google map on your android phone.

1. Have Proper version of Google maps app :
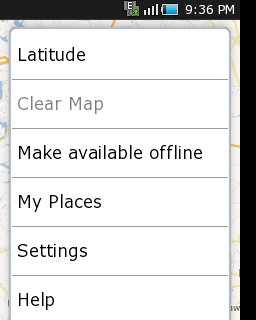
First of all you need to upgrade your google map app if it's older one. Now latest version available is 6.14.1 minimum, minimum  because this is what I upgraded to in 2012 october. You can check if you need to upgrade or not by Google map » Options » more » make offline available, if this option is available then you don't need to upgrade otherwise you need to. And important point to note - this feature is available on android version 2.2+, thank god I am just on edge. 
To upgrade this app goto google play store on your phone search for google map and upgrade if you need.
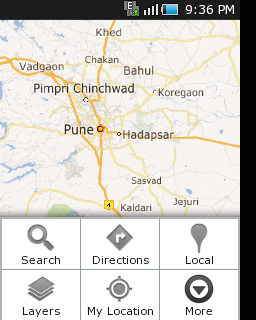
 
2.Make map available offline :

Once proper version of google map is available, open google maps application search for area whose map you want to be available offline on your android.
by using  options » search.
Once proper area's map is loaded select
options » more options » make available offline.


3.  Select Proper Area :

Now it will show rectangular area over the map to chose the area of the map to  download. screen should be showing size of the map of area you have selected in mb along with "select" button which would be disabled. Now pinch in and out over rectangular selection area to select area to download. Keep an eye on select button and size of the map. You can download a map only when select button is enabled. Generally minimum area of the map that you can download is  near about 67mb. keep trying to select size of rectangle so that select button is enabled. try keeping size of the map across 60 to 100 mb.


 4. Download map :
 
Once select button is available, click it and  your map will start downloading. 
wait till map is downloaded. Once it`s downloaded you are ready to use the map offline.


5.  Use offline Google map :

To use offline map, goto options » my places » OFFLINE tab there your offline map will be available. Select it and there you go with your offline map.

don't you worry about phone memory consumption this map doesn't get downloaded completely to your phone memory. I am not sure where exactly this offline map gets downloaded  on phone  but it doesn't  consume your phone memory. I am sure about this because my phone never has that much free phone memory. So cheers. 


6. Enjoy offline maps on your android.

Difference between DispatchAction and MappingDispatchAction in struts.

DispatchAction action class provides a mechanism for modularizing a set of related functions into single action. This eliminates the need to create separate, independent actions for each function.
MappingDispatchAction is subclass of DispatchAction used towards the same purpose. They are almost same except the way they are designed and used. Both of them rely on use on "parameter" attribute of action in action-mappings.

The main difference is about the way "parameter" attribute is used. In case of DispatchAction, value of  "parameter" attribute is used as attribute in request scope and value of this request attribute is mapped to the function name in the action class.

Eg. if it uses parameter="operation" then, operation attribute will be searched in request scope and it's value (say add) is mapped to the function name.
On the other hand, with MappingDispatchAction value of "parameter" attribute directly mapped to the function name.

Eg. if it uses parameter="add" then add is directly mapped to function name.


Because of above difference  the URL structure is also different. For DispatchAction url contains parameter information for configured parameter(operation). so url could be like

/user.do?operation=add

And for MappingDispatchAction url is simple one which need not to have any parameters for the purpose of function name mapping. So it could be like  

/user.do

Another difference from design point of view is about configuring actions in action-mappings. In case of  DispatchAction single action tag is used.


1
2
3
4
5
6
7
8
<action path="/user" 
         name="userForm"
         type="com.nilesh.action.UserAction" 
         parameter="operation"
         scope="request"
         input="/Welcome.jsp">
    <forward name="Success" path="/user.jsp"></forward>
</action>


and it's generally mapped from a single form having different operations with different values for configured "operation" parameter.
and For MappingDispatchAction we need to use multiple actions in action-mappings so the multiple forms with different values for action attribute of the html:forms.


1
2
3
4
5
6
7
8
9
<action path="/addUser" parameter="add"  type="com.nilesh.action.MappingDispatchUserAction">
<forward name="Success" path="/mappingDispatchUser.jsp"></forward>
</action>
<action path="/deleteUser" parameter="delete" type="com.nilesh.action.MappingDispatchUserAction">
<forward name="Success" path="/mappingDispatchUser.jsp"></forward>
</action>
<action path="/updateUser" parameter="update" type="com.nilesh.action.MappingDispatchUserAction">
<forward name="Success" path="/mappingDispatchUser.jsp"></forward>
</action>

So the difference is just about what you need and how to use.

Thursday, January 3, 2013

Great online tools worth using.

   These days "browser" is the most used application by most of the users on all kind of computers. People wants to do everything online. They want storage online, writing online, reading online, coding online, searching online and so on. We can say people are getting online more because they are getting more online. There are many great tools available online for doing things we used to do offline.
   Following are some of the great online tools or say apps, those are worth using. You might be using few of them already. 


1.  Evernote

Evernote
Evernote is a suite of software and services designed for notetaking and archiving. A "note" can be a piece of formatted text, a full webpage or webpage excerpt, a photograph, a voice memo, or a handwritten "ink" note. Notes can also have file attachments. Notes can be sorted into folders, then tagged, annotated, edited, given comments, searched and exported as part of a notebook. Evernote supports a number of operating system platforms (includingMicrosoft Windows, Mac OS X, Chrome OS, Android, iOS, Windows Phone, and WebOS), and also offers online synchronization and backup services.


The best way to save and view articles, videos and more. When you find something on the web that you want to view later, put it in Pocket. It automatically syncs to your phone, tablet or computer so you can view it any time, even without an internet connection.

JsFiddle is a playground for web developers, a tool which may be used in many ways. One can use it as an online editor for snippets build from HTML, CSS and JavaScript. The code can then be shared with others, embedded on a blog, etc. Using this approach, JavaScript developers can very easily isolate bugs.


4.  PasteBin
Pastebin.com is a website where you can store text for a certain period of time. The website is mainly used by programmers to store pieces of sources code or configuration information, but anyone is more than welcome to paste any type of text. The idea behind the site is to make it more convenient for people to share large amounts of text online.

Pixlr is a cloud-based set of image tools and utilities, including a number of photo editor, as screen grabber browser extension, and a photo sharing service. Founded in Sweden in 2008 by Ola Sevandersson , it was intended for non-professionals. It can be used on PCs, and on smartphones or tablets using an app.
The suite of apps range from simple and playful to advanced photo editing.

Dropbox is a file hosting service operated by Dropbox, Inc. that offers cloud storage, file synchronization, and clientsoftware. Dropbox allows users to create a special folder on each of their computers, which Dropbox then synchronises so that it appears to be the same folder (with the same contents) regardless of the computer it is viewed on. Files placed in this folder are also accessible through a website and mobile phone applications.

Google Drive is a file storage and synchronization service by Google. Google Drive is now the home of Google Docs, a suite of productivity applications, that offer collaborative editing on documents, spreadsheets, presentations, and more. 


Please feel free to suggest any other good online tool.

Sunday, December 9, 2012

Snipping Tool: Windows 7 built in screen capture tool

What do you do when you want to capture a screen shot, part of it or some window on windows machine? Don’t you press “Print Screen” button on a key board then do paste into mspaint and do the required capture, highlight or marking? If you have a windows 7 and you still do it this way only, then let me tell you ‘You live in stone era’.  Don’t you know about Snipping Tool?
 
Snipping tool is a free and simple screen capturing tool which comes built in with windows 7. This is another good built tool in Windows 7.

For opening Snipping tool, 
Click windows button and start typing “snipping tool” > You will see “Snipping tool”  under Programs. > Right click on it and select ‘Pin to Start Menu‘ or ‘Pin toTask Bar’ so that you can find it immediately when you need it.


Snipping Tool

When you want to take a snap of something, open a corresponding window and open this tool. There are three simple menus :


New Options

New : Select what you want to capture

     Free Form Snip: Capture free area of any shape.
    Rectangular Snip: Capture rectangular area.
    Window Snip: Capture an open window.
    Full Screen Snip: Captures full screen.
 
Cancel :  Use this if you want to minimize Snipping tool. Particularly when you want to capture different window than currently opened one.
 
Options : Use this to edit some preferences. 

Snip Editing
Once you have captured the snap, this tool opens your snip and provides you options to Save it, Get a new one, Edit it with colorful pens, Highlight area and an Eraser to undo pen and highlight editing.


 One Extra tip, not related to Snipping tool :
“You can take a snap of some window by opening that window and  “Alt + Print Screen” then paste into mspaint !!”

Sunday, December 2, 2012

Free Personal Source and Version Control Solution: Use SVN over Dropbox.

   Want to use some source control and version control tool for your personal use? And don’t want to use public repositories github? And also want to save your all source over a safe, reliable and sharable cloud? Then simplest and free solution is to use SVN, a very good version control tool, and save your SVN repository over your Dropbox account which will save your source over a safer cloud.

   For doing this download and install SVN tortoise client and Dropbox application on your machine. I hope you have an account on Dropbox : a file hosting service operated by Dropbox, Inc. that offers cloud storage, file synchronization, and client software(description copied from Wikipedia). Dropbox takes care of storage, safety, backup and sync for you.

   Once you have installed Dropbox and configured your account, you will be able to see your Dropbox folder on C:\Users\[YourUsername]\Dropbox. By default it syncs all of your Dropbox folders but you can select the folders to be synced from 

Dropbox > Preferences > Advanced > Selective sync.

   Now you are ready to create SVN repository over Dropbox. You just need to follow following simple steps:

1. Go to Dropbox folder, Create a new Folder, it’s your repository so name it accordingly. Right click on this new folder and select
 
Tortoise SVN > Create Repository here
 
Then you will see a dialog saying Repository Created as shown here..
2. Click on ‘Create folder structure’ to create trunk/branches/tags structure inside this new repository.


3. Bang!! Your repository with folder structure is ready now. Click ‘Start Repobrowser’  for opening repo-browser. Remember don’t ever ever ever modify this folder(your repository folder) of your own.  As this folder is SVN repository, it’s structure and data inside it is meant for SVN only.

4. Now you need to add your source code to your own SVN repository.  For that do this :

Right click on your workspace folder > TortoiseSVN >  import > give URL of a folder under trunk (you can copy URL of trunk from repo-browser and add required folder name to it after ‘/’ ) into ‘URL of repository’ > Ok. 

5. You have added your workspace to repository but it’s not versioned yet on your machine. For that right click on workspace folder and SVN Checkout the new imported folder from repository.

6. Once you have mapped your workspace to your local SVN repository, you can use your workspace and commit files as you were committing to standard SVN repository. Those files will just be committed to local repository.

  But don’t be curious about where these files go inside repository folder on your local machine, leave it to the SVN. Also don’t do any modifications to this repository folder. SVN takes care of everything.

7. Now your source code is inside your Dropbox folder that you should mark for sync from your machine if you are using selective sync. If you do manual sync of your Dropbox then keep good practice to sync this repository folder to Dropbox whenever you do any commit or changes that you must do from repo-browser only. Also keep in mind that this folder on Dropbox should also never be modified manually.

     You also can share this Dropbox folder to your teammates through Dropbox share and your teammates can use this folder directly as SVN repository.